# EvoSC Users Guide
# Download & Installation
EvoSC is currently unstable on windows systems and may not work as intended, or at all. Install at your own risk.
### Requirements
The following are the system requirements you will need to install and run EvoSC.
- PHP version at least 7.4
Here are some guides to install PHP 7.4 on common operating systems:
- [Install PHP 7.4 on Ubuntu](https://computingforgeeks.com/how-to-install-php-on-ubuntu/)
- [Install PHP 7.4 on Debian](https://computingforgeeks.com/how-to-install-latest-php-on-debian/)
- [Install PHP 7.4 on CentOS 7](https://computingforgeeks.com/how-to-install-php-7-4-on-centos-7/)
- [Install PHP 7.4 on CentOS 8](https://computingforgeeks.com/how-to-install-php-7-4-on-centos-rhel-8/)
- [Install PHP 7.4 on Fedora](https://computingforgeeks.com/how-to-install-php-74-on-fedora/)
- PHP Modules: `simplexml`, `mbstring`, `gd`, `dom`, `mysql`, `pcntl`, `curl`
- **(Optional)** If you want to setup the music server, you will need a web server like Apache or Nginx. You can most likely find these easily in the package manager for your operating system.
- Git. Again, you can find this in the package manager of your OS.
- MySQL database server (MariaDB for example).
- The ManiaPlanet/Trackmania dedicated server. For a guide on how to setup a dedicated server check out the tutorial for setting up a server on [Windows](https://wiki.trackmania.io/en/dedicated-server/Setup/Windows) or [Linux](https://wiki.trackmania.io/en/dedicated-server/Setup/Linux).
### Preparation
Before starting the preparation, make sure you have all the requirements listed above.
#### MySQL Database
You will need a MySQL database set up for EvoSC. The following is a simple process for setting up your first database to be used with EvoSC. Make sure you remember or note down your database name and user login info as you will need this later in the setup process. This guide assume you are running EvoSC on the same machine as your MySQL server.
- Connect and login to your MySQL server with a user that can create databases.
- Create a database, here we name our database evosc:
```SQL
CREATE DATABASE evosc CHARACTER SET UTF8mb4 collate utf8mb4_unicode_ci;
```
- Create a database user for evosc, here the name of the user is evosc:
```SQL
CREATE USER 'evosc'@'localhost' IDENTIFIED BY 'your password';
```
- Grant the user all access to the new database:
```SQL
GRANT ALL PRIVILEGES ON evosc.* TO 'evosc'@'localhost';
```
#### (Optional) Dedimania
If you are running a ManiaPlanet server, you might want to set up the Dedimania records widget.
1. Go to this page and login with maniaplanet: [http://dedimania.net/tm2stats/?do=register](http://dedimania.net/tm2stats/?do=register)
2. Click the **Register your dedicated servers** button.
3. Follow the instructions to register your server and note down the DedimaniaCode it gives you.
By default Dedimania will only register any records in the top 30 only. If you want to raise this ceiling you will have to donate to Dedimania, more information can be found [here](http://dedimania.net/tm2stats/?do=donation).
#### (Optional) Music Server
The music server provides EvoSC with custom music to be played on the server. For this you will need a web server, either Nginx or Apache will suffice (check requirements above).
1. If you want to create a directory in your web files of your web server, this is the time to do it.
2. Go to the directory you made in step1, or just the web root if not.
3. Download the music server [here](https://github.com/EvoTM/EvoSC/blob/master/core/Modules/MusicClient/music-server/music-server.zip) and extract the zip file.
4. Note down the URL pointing to the music server. Use this URL later in the installation process.
### Installation with git
Git is currently the only way to install and update EvoSC, here is how you do it:
1. Open the terminal and go to or create a directory where you want EvoSC to be installed.
2. Clone the repository with git: `git clone https://github.com/EvoTM/EvoSC.git`
There are currently two versions of EvoSC. You have the the master or the development branch. The master branch usually contains the most stable version, but the development branch has all the latest changes and features. If you want to use the development branch you can check it out with `git checkout develop`.
3. The previous step will create a new directory `EvoSC`, cd into it: `cd EvoSC`
4. Run the composer setup: `composer i --no-dev`
5. Start EvoSC for the initial installation process: `php esc run`
6. Follow the setup guide which EvoSC provides.
### What's Next
To learn more about how the controller works and how you can customize it, check out [Getting Started](https://wiki.evotm.com/books/evosc/page/getting-started "Getting Started").
# Updating Existing Installations
### Updating with git
To update an existing installation with git do the following:
1. Open a terminal and go to the directory of your EvoSC installation.
2. Enter: `git pull`
3. Update composer: `composer install --no-dev`
4. Restart EvoSC, you can use the in-game command `//restart-evosc` and remember that you might have to reset your interface with `/reset`.
# Getting Started
If you have not installed EvoSC already, you can follow [this guide](https://wiki.evotm.com/books/evosc/page/download-installation "Download & Installation").
### Bugs, issues or suggestions
If you found a bug or have a issue with EvoSC, please make a report in the Github issues: [https://github.com/EvoTM/EvoSC/issues](https://github.com/EvoTM/EvoSC/issues)
If you also have a suggestion or improvement to the controller, you can post them there as well. Any other general questions can be asked in our Discord server.
### The directory structure
In the EvoSC installation there are three noteworthy directories:
- **config** - Contains all the configuration files for the controller and its modules.
- **logs** - In this directory the auto-generated logs will be placed. This is the place to look for figuring out issues with the controller.
- **modules** - This is where you can install any third-party modules you may find desirable.
It may happen at times that you would find the **cache** folder interesting as you may need to clear or modify the cache in order to fix some problems.
### Add yourself as master admin
Before you do anything, you may want to add yourself as a master admin so that you have access to all the features in-game. To do this you can run the command:
**NOTE:** For TM2020, your login is NOT your Ubisoft Connect username. To find your login, go to [https://trackmania.io](https://trackmania.io), look up your Ubisoft Account in the "Players" tab and go to your profile. Copy the value listed in the Login field.
```shell
php esc add:admin YourLoginHere
```
If you are already on your server, you will have to rejoin for the rights to take effect.
### The server configuration
You can find the server configuration in the file **config/server.config.json**. This file might be useful to know about to edit some the behavior of the controller and connection to the dedicated server. Here are explanation for some of options:
| **Option** | **Description** |
| `login` | The login of your dedicated server account. |
| `ip` | The host/IP address of your dedicated server. |
| `port` | This is the XMLRPC port of your dedicated server. |
| `rpc.login` | The super admin username of your dedicated server. |
| `rpc.password` | The super admin password of your dedicated server. |
| `default-matchsettings` | This is the file that will be the default MatchSettings file of your server. |
| `map-cooldown` | This option controls how often a map can be played. The numnber indicates how many maps must be played before a map can be played again. |
| `afk-timeout` | How long a player must stay afk for them to be forced into spectator mode. |
| `echoes.join` | If enabled, the controller will show player join messages in the chat. |
| `echoes.leave` | If enabled, the controller will show message of players leaving the server. |
### Customizing the theme
The file **config/theme.config.json** contains options for customizing the colors of your EvoSC installation.
- Under the `chat` option, you can find several colors for modying a message.
- The `text` option controls the color of messages from players in the chat.
- The other options controls the colors for informational messages like info or error messages.
- The options under the `hud` part is used for controlling the color of the widgets and windows of the controller.
- `accent` - This is the general color of the controller, the header of the widgets and windows will have the color of this option.
- The `text-*` options controls the colors of the text in the widget and windows.
- `bg-*` options controls the background colors of the windows and widgets.
All the colors are based on the HTML HEX color format. You can find a color picker that generates these HEX values [here](https://www.google.com/search?q=color+picker).
The colors under the chat option uses a slightly different format. The general text formatting of the Trackmania games uses a three digit hex code instead of six. You can find some colors and read more about it [here](https://doc.maniaplanet.com/client/text-formatting).
### Enabling and Disabling modules
The modules are what gives EvoSC it's features and functionality in general. Every module has a configuration file attached to them. You can find these under the **config/** directory.
In a module config file there is always a option called `enabled`. You can enable a module by setting this to `true` and disable it by setting it to `false`.
### Adding maps from Trackmania Exchange
You can find a bunch of maps from the exchange websites, there are two exchange websites in concern for this controller:
For Trackmania 2020 use [https://trackmania.exchange](https://trackmania.exchange)
For Trackmania 2 use [https://mx.mania-exchange.com](https://mx.mania-exchange.com)
You can easily add maps from TMX/MX with the add command. In order to add a map, find your map on the exchange website and note down the **Track ID**. Then add the map with the command:
```
//add track-id
```
Where **track-id** is the numeric id you noted down.
# EvoSC Competition Guide
A guide that shows you how to use EvoSC in competitions.
# Useful Commands
| **Command** | **Example** | **Description** |
| `/help` | | Displays list of commands. |
| `//setpw ` | `//setpw myawesomepassword` | Sets the entry password for the server. Leave empty to clear. |
| `/reset` | | Resets the interface if it broke. |
| `//mute ` | `//mute player` | Mute player. |
| `//unmute ` | `//unmute player` | Unmute player. |
| `//asay ` | `//asay Hello everyone!` | Displays a big message in the center of the screen. Leave empty to clear. This command can be very useful to gain players attention. |
| `//mode ` | | Change the game instantly mode. |
| `//ban ` | `//ban player` | Ban and blacklist a player. |
| `//kick ` | `//kick player` | Kick a player from the server. |
| `//addtime ` | `//addtime 10` | Add time to the time attack timer, negative time to remove. |
| `/maps` | | Open the map list. |
| `/jukebox` | | Open the jukebox. |
| `//vote ` | `//vote Do you like pizza?` | Start a vote with a custom text. |
| `//skip` | | Skip to the next map instantly. |
| `//res` | | Queue the current map for replay. |
| `//add ` | `//add 3425` | Add a track from Trackmania Exchange. |
| `//addpack ` | `//addpack 325` | Add all tracks from a map pack from Trackmania Exchange. |
| `//addpoints ` | `//addpoints 50` | Add points to the points limit, negative number to remove. |
| `//msm` | | Open the match settings manager where you can load match configurations. |
| `//shuffle` | | Randomize the current map list order. |
# Maps
## Commands
| **Command** | **Example** | **Description** |
| `/maps` | | Open the map list. |
| `/jukebox` | | Open the jukebox.
|
| `//add ` | `//add 2352` | Add a track from Trackmania Exchange. |
| `//addpack ` | `//addpack 352` | Add all tracks from a map pack from Trackmania Exchange. |
| `//shuffle` | | Randomize the map order. |
## Map List
[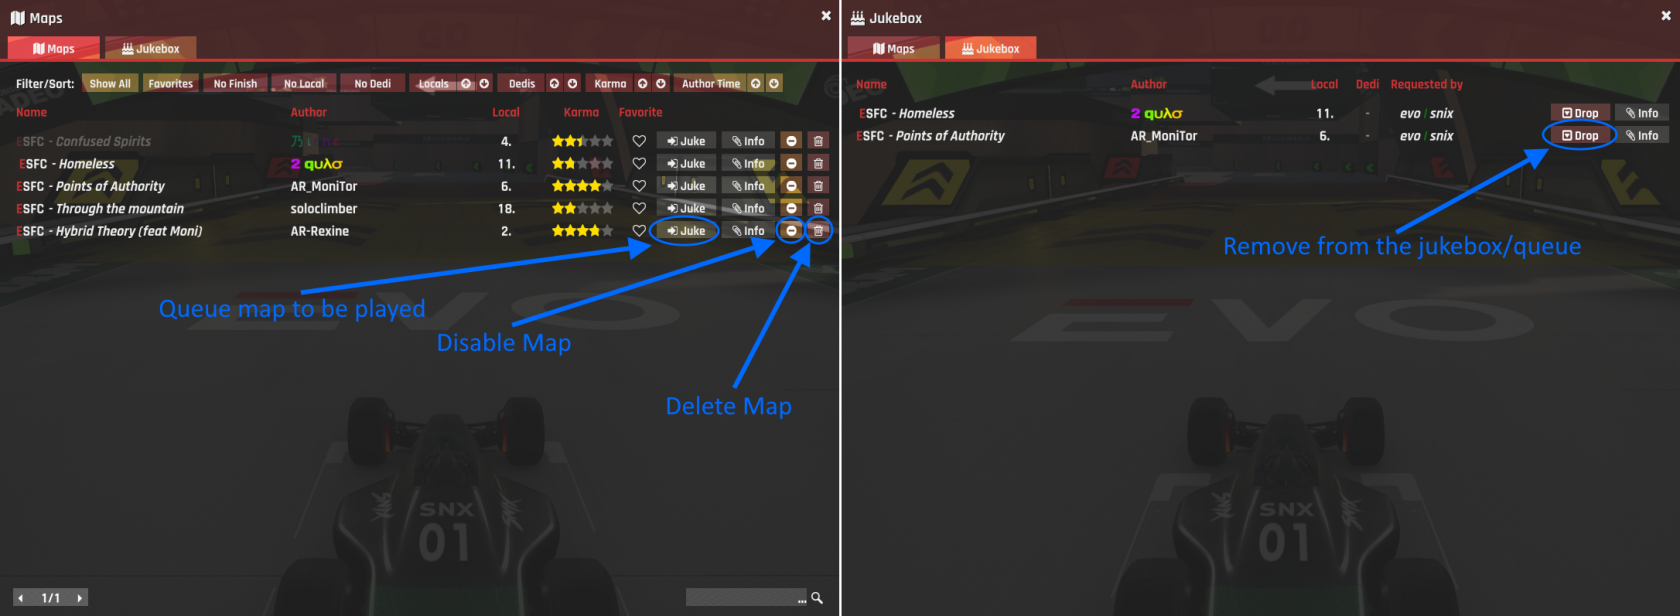](https://wiki.evotm.com/uploads/images/gallery/2021-01/maplist.png)
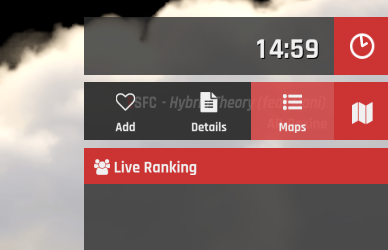
To open the map list there are two options. You can type **/list** or click the **Maps button** in the current map widget near the *top left of the screen*:
[](https://wiki.evotm.com/uploads/images/gallery/2021-01/Trackmania_130121_145946_363.png)
# Admin Controls
EvoSC provides several ways for you as an admin to manage players and the match during competitions.
## Commands
| **Command** | **Example** | **Description** |
| `//mute ` | `//mute playername` | Mute player. |
| `//unmute ` | `//unmute playername` | Unmute player. |
| `//ban ` | `//ban playername` | Ban and blacklist a player. |
| `//kick ` | `//kick playername` | Kick a player from the server. |
| `//addtime ` | `//addtime 10` | Add time to the time attack timer, negative time to remove. |
| `//addpoints ` | `//addpoints 50` | Add points to the points limit, negative number to remove. |
| `//skip` | | Skip to the next map instantly. |
| `//res` | | Queue the current map for replay. |
## Interface
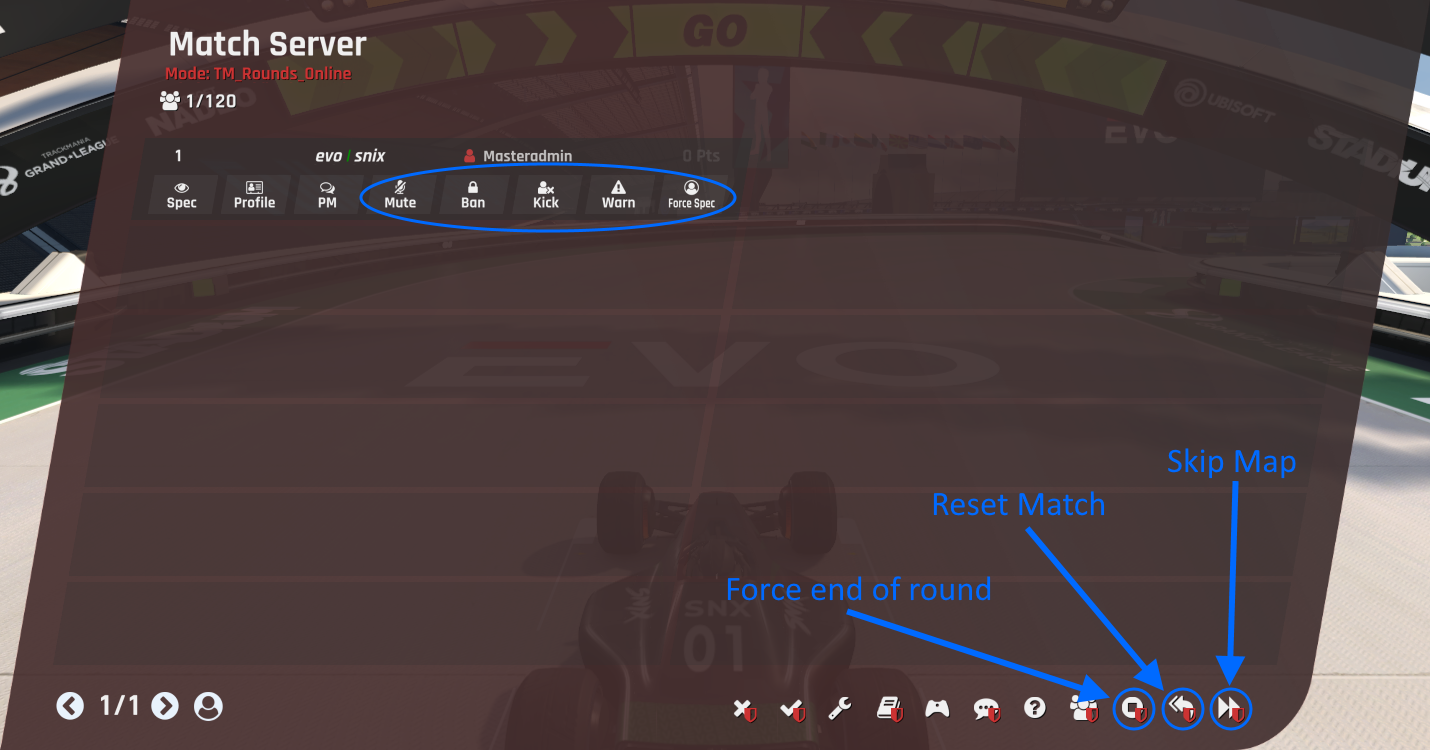
### Scoreboard
The scoreboard has various admin controls for easy access:
[](https://wiki.evotm.com/uploads/images/gallery/2021-01/M8xscoreboard.png)
The scoreboard offers flow control of the game as well as buttons for moderating players (move your mouse over the player item). Depending on the current game mode running, the flow controls like Force end of round may or may not show.
| **Flow Control** | |
| Force end of round | This instantly ends the current round and skips to the next one. |
| Reset Match | Reset all points and times gathered by the players and start the whole match from fresh again. |
| Skip Map | Skips instantly to the next map. |
| **Player Control** | |
| Mute | Mute/Unmute the player, which prevents them from sending messages in the chat. |
| Ban | Ban and add the player to the blacklist. |
| Kick | Disconnect the player. |
| Warn
| Sends the player a warning. |
| Force Spec | Forcefully put the player in spectator mode. |
### Warmup
During warmup admins have the option to instantly skip it at any time by clicking the **Skip WarmUp** button in the warmup widget:
[](https://wiki.evotm.com/uploads/images/gallery/2021-01/chrome_020121_150306_240.png)
### Teams
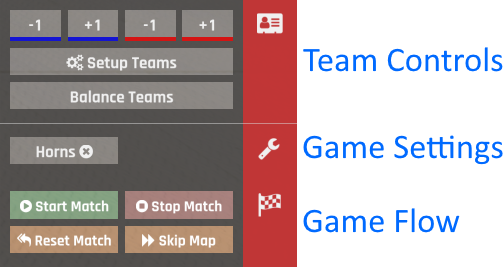
During team mode, EvoSC offer admins a bunch of control over teams and the flow of the match. This is provided by the team controls widget as shown in this image:
[](https://wiki.evotm.com/uploads/images/gallery/2021-01/teams_control.png)
| **Team Controls** | |
| -1, +1 | Add or remove points from the teams. The color indicates which team it is for. |
| Setup Teams | Configure team information like color and names. |
| Balance Teams | Automatically balance teams that are uneven in size. |
| **Game Settings** | |
| Horns | Toggle the ability for players to use their horns. |
| **Game Flow** | |
| Start Match | |
| Stop Match | |
| Reset Match | Reset all points and times gathered by the players and start the whole match from fresh again. |
| Skip Map | Skips instantly to the next map. |
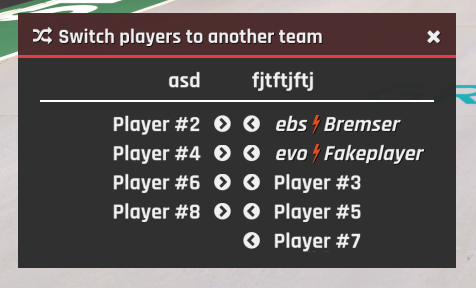
##### Switch player to another team
To switch the team of a player, call **//switchplayer** or click "Switch player team" on the scoreboard. A window will open that allows you to switch players to another team.
[](https://wiki.evotm.com/uploads/images/gallery/2021-01/image-1610737014493.png)
# Match Settings
Match settings is the core configuration for all game modes and matches in Trackmania. This is where you configure how the match will play out.
## Match Settings Manager
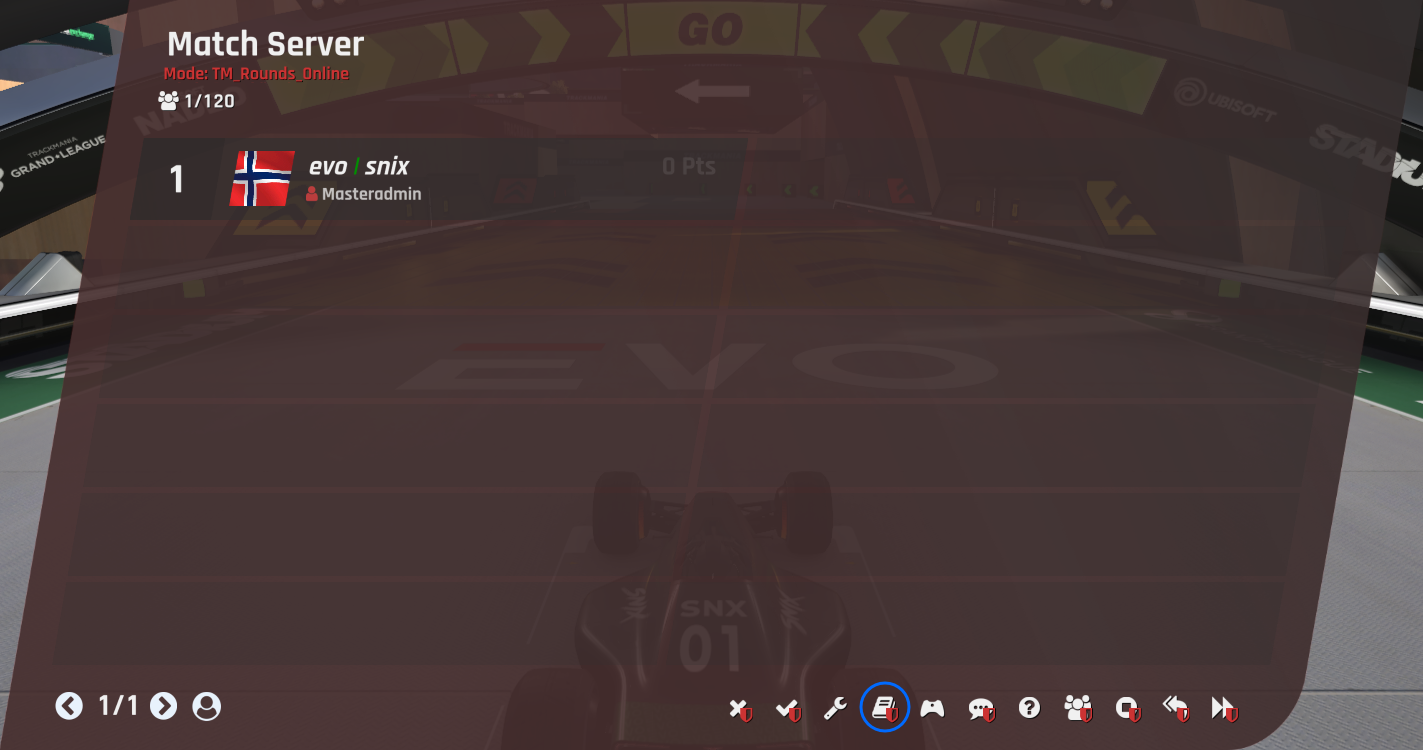
The server's match settings is a tool that allows you to create, edit and load different match settings profiles. There are two ways to open it, you can either type **//msm** or click this button in the scoreboard:
[](https://wiki.evotm.com/uploads/images/gallery/2021-01/screenshot2.png)
This window is then shown:
[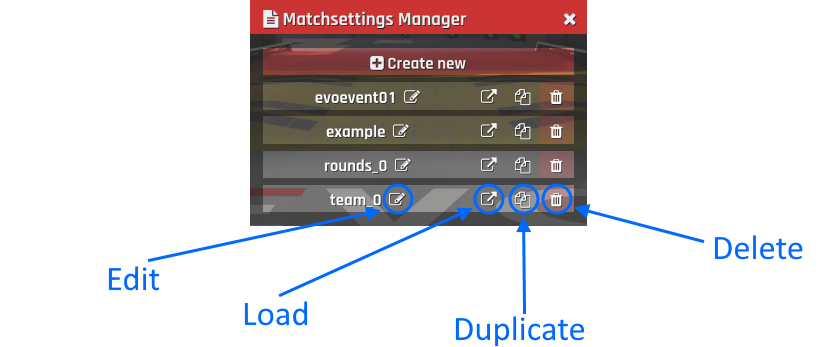](https://wiki.evotm.com/uploads/images/gallery/2021-01/msm.png)
As an admin you most likely don't have to worry about creating and editing the match settings profiles, but what might interest you is loading them. The button with the arrow pointing up will load the profile and automatically configure the server. The process for loading match settings is as following:
1. Click the load button on the profile you want to load.
2. Reset the match or skip to the next map to let the changes take effect.
### Quickly changing modes
You can quickly change between time attack, rounds, cup mode etc. by just typing **//mode** and select the mode you want to load. Then reset the match or skip to the next map.